Sveiki, gal kam idomu nuo kokios temos pradedam kurti filmuka?
na pagrindine mintis kad is arti matysim spilbergo veida, kuri high poly jau baugineja modelinti.... ir visas veiksmas vyks su jo veidu... naudosim personazus is jo filmu.... pvz. kamerai pasisukus ir prizoominus dinozauras begs per veida.... ar ten koks Indijana Dzonsas su virve leisis is nosies ir pan... tai dabar stadija brainstormingo... t.y. galvojam kaip ir kokius shootus sudeti....
jei ir jums kilo kokiu minciu tai prasom parasykit....
Naujienos is NoiZzy
Žinutės: 316
Miestas: Vilnius
Prisijungė: 2007-01-15
Miestas: Vilnius
Prisijungė: 2007-01-15

Žinutės: 757
Miestas: Kaunas
Prisijungė: 2006-11-17
Miestas: Kaunas
Prisijungė: 2006-11-17
Žinutės: 167
Miestas: Ukmerge
Prisijungė: 2007-07-05
Miestas: Ukmerge
Prisijungė: 2007-07-05
Žinutės: 757
Miestas: Kaunas
Prisijungė: 2006-11-17
Miestas: Kaunas
Prisijungė: 2006-11-17
![]()
Žinutės: 249
Miestas: Alytus - Kaunas
Prisijungė: 2005-12-24
Miestas: Alytus - Kaunas
Prisijungė: 2005-12-24
Gera idėja, ypač dėl Indianos, kaip koks snarglys iš nosies 😀 , kai pabaigsit gal pasidalink ir su mum
0 Taškai
Žinutės: 167
Miestas: Ukmerge
Prisijungė: 2007-07-05
Miestas: Ukmerge
Prisijungė: 2007-07-05
o tai kas surezisavo transformerius, ne Spilbergas? tik gal juos kiek sunkoka sukurt butu, bet juk ten visi prafai ir tikrai manau sunkumu jiems nebus 🙂
0 Taškai
Žinutės: 757
Miestas: Kaunas
Prisijungė: 2006-11-17
Miestas: Kaunas
Prisijungė: 2006-11-17
transformerius rezisavo Michael Bay
bet jau cia offtopic rimtas
bet jau cia offtopic rimtas
0 Taškai

Žinutės: 1132
Miestas: EIRE
Prisijungė: 2005-03-26
Miestas: EIRE
Prisijungė: 2005-03-26
Žinutės: 167
Miestas: Ukmerge
Prisijungė: 2007-07-05
Miestas: Ukmerge
Prisijungė: 2007-07-05
Žinutės: 757
Miestas: Kaunas
Prisijungė: 2006-11-17
Miestas: Kaunas
Prisijungė: 2006-11-17
nu nesvarbu 😀
laukiu nesulaukiu tu foto ish NoiZzy =]
laukiu nesulaukiu tu foto ish NoiZzy =]
0 Taškai
Žinutės: 316
Miestas: Vilnius
Prisijungė: 2007-01-15
Miestas: Vilnius
Prisijungė: 2007-01-15
vienas musu destytuvas dirbo apsvieteju su Micheal Bay ir pasakojo kad jis grybauja juodai....o spilbergas dirbo taip pat prie to projekto taciau kiek girdejau ten jo nelabai kas klause nuomones ....jis dirbo prie tokiu scenu ka i robotas islipa is baseino ir stovi maza mergaite...
kas nebutu keista, jo pavardes imdb prie transformeriu filmo neradau, taciau perziurejus biografini sarasa prie kuriu projektu jis dirbo, galime matyti ir transformerius 🙂 taip pat jis padeda ir prie 2 dalies transformeriu....
p.s. matyt zmogus nenorejo uzparashinti savo vardo 😀
p.s.2 tai kur man tas foto sumesti?
imdb.com
--
Less is more!
0 Taškai
Žinutės: 757
Miestas: Kaunas
Prisijungė: 2006-11-17
Miestas: Kaunas
Prisijungė: 2006-11-17
Žinutės: 316
Miestas: Vilnius
Prisijungė: 2007-01-15
Miestas: Vilnius
Prisijungė: 2007-01-15
na cia papeistinsiu info is compositing class... gal bus naudinga pradedantiems...
Week Three: 3D Render Layers, Render Passes, Z Depth, Cameras and 3D in After Effects.
Guest speaker. Ask general career questions. How did you get started, what school did you go to. What projects have you worked on. Show reel. Question on how was this or that effect done. Show trained eye effects, fex, bloom on Edge bloom on Spiderman. Interactive shadows. More career tips. Networking, resumes, reels. Work ethic. What is a sausage shadow ? Anecdotes from work.
Look at students 3d projects up to now. We will Have to do final projects, so show me what you have and we can talk about what to do. By next week, you should have already something half way there.
Show example bh60 images from Zathura. Multipass, multi layers, in 3d and live shoot. Why rendering separate layers and lights is important. Show tk, explain passes rendered. Show ticket shot, explain spec passes.
I. Render Layers and Passes
A) Render Layers and passes in Maya.
Rendering separate Lights in Maya.
Rendering Occlusion and Contact in Mental Ray.
Building a Comp for Render Layers/Passes.
(Rendering passes from Maya, simple sphere. Show Maya rendering in passes. Create rendergroup for Sphere to render bty, diff, sepec. Create second render layer with sphere AND ground for shadow only. Render AmbOcc pass with mental ray from different maya file. Comp in AE and Shake)
Import your files; since you will be using many layers and passes, it is crucial that you organize your file. You can also import directory.
1. Depending on the amount of Layers/Passes, you may create a Comp for each individual layer. For Example, Layer Comp>Inside the comp are the Passes.
2. Create ONE Final Output Comp with individual Layers Comps in it.
Specular is added. Shadow can be multiplied or over, behind the object. Light passes are Added to each other.
II. Rendering and using Z depth information from Maya.
Render .RLA files for After Effects, IFF files for Shake. Show zdepth sphere example. 3d channel extract. Forget Adobes other 3d filters. Use your own by extracting the z matte,..invert levels etc.
Macro in Shake to extract Z.
Simple Cylinders example.
Alternative to Zdepth,…depth shaders. Try out the Maya version, hand out Mental ray version.
Explain and render Y grads.
II. 3D In After Effects
A) “Turn on” 3D
For utilizing After Effects 3D tools, first you must:
1. Turn on the layer which is intended to be 3D. Do this by Clicking on the “Switches” in the timeline and then Clicking the 3D Layer Icon. (Small 3d cube)- Do this for EVERY layer that needs to be manipulated in 3d space.
2. Open the Composition Settings and go to the Advanced Tab. Advanced will let layers intersect.
3. Change your Comp Views. Top Menu> Window>Workspace> 4 Comp Views, then set your views.
4. Animate Position, Scale, Rotations, Opacity and Orientations as always.
5. Every 3D layer turned on has a new Material Options dropdown added.
**Note: Although objects/layers are in order within the timeline. In 3d space they are all on the same Z space until their position is moved to be in front or behind each other.
A) Lights
Lights in AE work the same way that they do in Maya, however without all the control.
1. Create a light by going to the Top Menu and Layer>New>Light.
2. Edit Color, Intensity and attributes at will.
**Note: If you find that shadows are not being cast, turn on Cast Shadows for that LAYER.
C) Cameras
1. Create camera by going to the Top Menu and Layer>New>Camera. Attributes are similar to a real camera. You have control over Depth of Field, Focus Distance, Aperture, Zoom, and many more by double clicking the camera layer.
II. Importing Maya Cameras
A) Camera Data
At times you may need to import a Camera or Animated Camera from Maya into After Effects. To do this, you must follow a few key things:
1. After Effects will ONLY read ASCII files. It will NOT read any geometry information.
2. Make sure your Maya scene is completely empty except for the default cameras, and your created Camera.
3. Import this into After Effects. A new Comp will be created for that Camera Specifically. Any additional items that need to be animated or comped in will go UNDER the camera layer, and the 3D layer needs to be turned on.
I
If time permits. Recap classes, most important lements we have studied till now.
Students by now should be proficient in
Layer hierarchy, nesting and precomposing.
Keyframing
Tracking and Stabilizing. What points are good for tracking? What to use on set.
Familiar with shortcuts and editing in AE timeline.
Track mattes and why do we need them.
What is Rotoscoping and how to di t correctly.
Rendering passes and separate lights. AmbOcc and contact.
Rendering and using Z depth information.
3D inside After Effects.
****taip pat destytuvas rode kaip "fake the z_deph" sukurti black and white ramp, apply to a surface shaders, nujamti atspindzius ir t.t. ,make as projection, project from the top, and you get the same effect....
--
Less is more!
0 Taškai
Žinutės: 316
Miestas: Vilnius
Prisijungė: 2007-01-15
Miestas: Vilnius
Prisijungė: 2007-01-15
Week Four: 3D Blue and Green Screen Removal, Keying, Choking and Channel Shifting.
I. Blue and Green Screen
Although the Blue and Green screen are two different ways to shoot live action footage, the approach for keying them is relatively the same. They are just shot on either blue or green depending on the scenes elements. The best way to organize your files, is to build a comp that has your Foreground and Background Plates in it. Foreground is on top, BG is on the bottom. These are the most commonly used effects to key, and they are ONLY in the Production Bundle of Adobe After Effects. Use them in combination and mix and match them to get the best results. Compositing is not an exact science; there are a variety of tools that are used in conjunction to help you achieve the best result.
A) Color Difference Key
1. A quick way to pull a key, and is the most powerful tool AE has is the Effects>Keying>Color Difference Key- Use the “key color” eyedropper and select your Key BG color.
2. In the Effects Window use the middle black eyedropper to select your black or transparent background color range. You can select it right in this window. Use the lower white eyedropper to select the foreground element.
3. Fine tune using the Matte In Black, Matte In White, and Matte Gamma.
4. Use the ‘view’ dropdown to display the final result of your changes.
**Note: Compositing doesn’t really have a “right” or “wrong” set of tools. Many of these you will use often on ONE plate. Especially Spill Suppressor, Color Difference key, Color Range Key, Levels, etc…
😎 Spill Suppressor
1. Use the “color to suppress” eyedropper to select the “excess” or “spilled” color, this is usually a halo around your FG element that is left over from your main Keying effect.
2. Color Accuracy dropdown; Depending on the size of your plate, you might want to use “faster” for a quicker display refresh result.
3. Suppression is a “absorption” threshold for the selected color.
C) Color Key
All off these Keying tools work in a similar method, but uses a different program algorithm toe get different results. Most of them start with a user selected key color- and controls to adjust them.
1. Tolerance: is another threshold control for the amount of color being keyed or made transparent to show the background.
2. Edge: This actually reduces and removes pixel data around your keyed element. Depending on what your object is, you might be able to use this. It is NOT good for people or hair, because it will actually remove the hair and its details.
3. Edge Feather: This is a fancy way of saying “blur”…
D) Color Range
This basically works the same way as the Color Difference Key, but it displays the Matte, and controls for the LAB, YUV, and RGB color models. Tweak away. 😋
E) Difference Matte
This is used for plates in the same “set” of elements for a shot. For example if you have a blue screened Person, and a separate object in the same scene, like a table- this will pull a key by “canceling” out the key color in the 2 plates.
II. Matte Choking
Choking is the
Under Effects>Matte Tools> Matte Choker and Simple Choker are used to manipulate your matte edge or tolerance between the black and white values. Again, Tweak until its visually “correct” …no exact science here.
After there is a matte pulled from a plate, use the Effect>Channel>Set Matte to “set” or lock in the matte in as an alpha channel. From here you can use any of the Color adjusting tools, like levels to adjust your matte.
III Channel Shift
Channel shifting is a very valuable and time saving method of separating 3d elements without rendering an alpha channel. The effect utilizes the full saturated R, G, and values to pull a transparent mask from only ONE image, or image sequence-rather than an individual alpha channel for every layer.
A) Maya Set up
1. Create a Texture Reference from your scene.
2. Create 3 lambert shaders one for each object. Make them fully saturated Red, Green and Blue. They are presets in the Maya color picker.
3. Assign these to the Foreground elements in the scene. Render the sequence, leave the background Black. Your result should be objects that are only red green and blue on a black background.
😎 After Effects Setup
1. Import frames into After Effects. Create a Comp for each of the RGB channels. Name them Red, Green and Blue. You should have 3. Add your footage to the comps.
2. For the Red Comp, Duplicate your footage layer. Apply the Effect>Channel>Shift Channels effect to the top layer. Leave the Take Alpha from Alpha, “Tell” the Take Red, Green and Blue to from the Red channel.
3. Use this layer as a Track Matte for the duplicate layer below it. Repeat this process for each of the channels. Then take your Red, Green and Blue Comps and put them into ONE comp. Voila! You have mattes for each of the objects using one file. You are now free to move 2d/3d objects in between these.
**Note: Before using Channel Shift or any other compositing method it is wise to evaluate what needs to be done per shot. Depending on the situation, this may or may not be the most effective way to create a mask depending on the amount of elements.
--
Less is more!
0 Taškai
Žinutės: 316
Miestas: Vilnius
Prisijungė: 2007-01-15
Miestas: Vilnius
Prisijungė: 2007-01-15
Week Five: Effects
All of After Effects special effects filters are located in Top Menu>Effects. The best way to get yourself familiar with the effects is to sit and play with them. You can read up on them, but it wont give you a visual result-which is much quicker to learn. Once you know what all the effects do, you can problem solve quicker when you’re trying to create a desired effect. For example if you need to have a “teleport” effect, think in “layers” and about which effects can help in achieving your goal. Off the bat you will know that transparency will play a part, and ways to stylize the effect of someone fading away. You can only achieve this by knowing your tools.
There also isn’t rule or guideline as to what effects “should” be used. Use as many as you want- as long as you can control them, and it doesn’t affect your render time in a given situation. Mix and match effects, use track masks, masks, and alpha channels. It is also good to research plug-ins for After Effects. Many of them are very helpful, and save time. Here is a list of resources to investigate. Good luck in your CG endeavors beeyatches! 😋
Plug-In Resources
These are some of the most widely-used plug-ins for Adobe After Effects.
Digital Anarchy
digitalanarchy.com
RE:Vision Effects
revisionfx.com
Reelsmart Motion Blur - Motion Blur
Twixtor - Time Remapper
Red Giant Software
redgiantsoftware.com
Knoll Light Factory
Image Lounge
Primatte Keyer
Alien Skin Software
alienskin.com
Eye Candy
XenoFex
Walker Effects
walkereffects.com
Essential Alpha, Color, Gradient and Channel tools
BorisFX
borisfx.com
Color, Film Effects, Flares, Tracking and Keying
The Foundry
thefoundry.co.uk
Tinderbox
Furnace
Keylight
Trapcode
trapcode.com
Shine
Starglow
Lux
Sound Keys
3d Stroke
Particular
I. Blue and Green Screen
Although the Blue and Green screen are two different ways to shoot live action footage, the approach for keying them is relatively the same. They are just shot on either blue or green depending on the scenes elements. The best way to organize your files, is to build a comp that has your Foreground and Background Plates in it. Foreground is on top, BG is on the bottom. These are the most commonly used effects to key, and they are ONLY in the Production Bundle of Adobe After Effects. Use them in combination and mix and match them to get the best results. Compositing is not an exact science; there are a variety of tools that are used in conjunction to help you achieve the best result.
A) Color Difference Key
1. A quick way to pull a key, and is the most powerful tool AE has is the Effects>Keying>Color Difference Key- Use the “key color” eyedropper and select your Key BG color.
2. In the Effects Window use the middle black eyedropper to select your black or transparent background color range. You can select it right in this window. Use the lower white eyedropper to select the foreground element.
3. Fine tune using the Matte In Black, Matte In White, and Matte Gamma.
4. Use the ‘view’ dropdown to display the final result of your changes.
**Note: Compositing doesn’t really have a “right” or “wrong” set of tools. Many of these you will use often on ONE plate. Especially Spill Suppressor, Color Difference key, Color Range Key, Levels, etc…
*******p.s. si informacija skirta pradedantiesiams**************
--
Less is more!
0 Taškai
Žinutės: 316
Miestas: Vilnius
Prisijungė: 2007-01-15
Miestas: Vilnius
Prisijungė: 2007-01-15
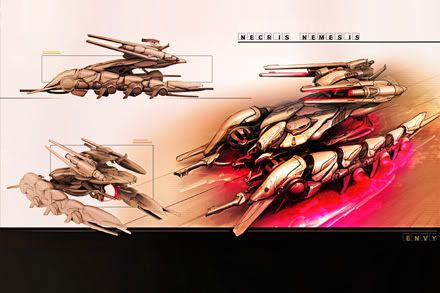
Jus tikriausiai jau matet kad isejo unrealas 3, zinant kad dabar zaidimu biudzetai didesni nei filmu, tai nieko nuostabaus matant toki concept arta....
features.cgsociety.org
galima daug ka pasimokyti.....
unrealtournament3.com
cia video apie zaidima, nu tikrai ispudinga....
gametrailers.com
features.cgsociety.org
galima daug ka pasimokyti.....
unrealtournament3.com
cia video apie zaidima, nu tikrai ispudinga....
gametrailers.com
--
Less is more!
0 Taškai

Žinutės: 266
Prisijungė: 2006-06-30
Prisijungė: 2006-06-30
Žinutės: 316
Miestas: Vilnius
Prisijungė: 2007-01-15
Miestas: Vilnius
Prisijungė: 2007-01-15
blackR cia daugiau After efektams... mus moko kad jei nori buti specas 3d turi ismanyti ir compositing, nesvarbu ar tai after efektai ar shake ar kitas paketas...
del skirtingu programu- kaip zinai maya ir maxas priklauso vienai kompanijai ir siu 2 programu susijungimas manau yra neisvengiamas, ir as to tikiuosi kuo greiciau, nes jei zadu gristi i LT tai cia kiek zinau dauguma (95%) dirba su maxu, taciau esme programos yra ne interfaco zinojime, bet fizikiniam supratime kokia funkcija atlieka... jei turi pakankamai ziniu tai persiorientuoti galima greitai... tik as to proceso kazkodel nelabai noriu 🙂
del skirtingu programu- kaip zinai maya ir maxas priklauso vienai kompanijai ir siu 2 programu susijungimas manau yra neisvengiamas, ir as to tikiuosi kuo greiciau, nes jei zadu gristi i LT tai cia kiek zinau dauguma (95%) dirba su maxu, taciau esme programos yra ne interfaco zinojime, bet fizikiniam supratime kokia funkcija atlieka... jei turi pakankamai ziniu tai persiorientuoti galima greitai... tik as to proceso kazkodel nelabai noriu 🙂
--
Less is more!
0 Taškai
Žinutės: 316
Miestas: Vilnius
Prisijungė: 2007-01-15
Miestas: Vilnius
Prisijungė: 2007-01-15
sorry, kuris laikas neapdeitinau forumo. taigi dabar pats laikas. Noreciau papasakoti apie viena paskaite. taip skamba apibudinimas angliskai:
"The ability to create custom-made 2D texture maps is fundamental for a 3D artist. In this course students learn about different artistic styles, levels of craftsmanship (handmade, manipulated scanned imagery and 3D compositing), repetition structures, and tileable and seamless motifs. Learn also the secret behind any good texture art: the layering technique, where overlapping elements form rich and beautiful work."
na turejom dar tik 3 paskaitas tai galiu papasakoti ka veikem. Pirmaja paskaita tai piesem ant nuortauku su PS. reikejo susirasti nuotrauka ir ant jos piesti. KOdel ne nuo nulio? nes taip greiciau. apskritai sioje industrijoje yra viskas daroma kad kuo greiciau ir kuo geriau. Jei kitas ta pati padarys per trumpesni laika, ji samdys ne tave. todel moko kaip dirbti greitai. todel susirandi foto- su zmogum ir ant jo piesi, darai mecha ar dar koki velnia 🙂 tai cia pirma paskaita buvo.
2 paskaita- texturos and maps for games a) susirandi pastata, ji nusifotkini is visu kampu ir atstumu. b) issikerpi viena dali su PS. istrini visas detales kurios galetu kartotis, nes ta viena langa veliau dublicatinsim, tai kad nesimatytu. (512x512) c)isikeli i maya, uzmeti ant plano su 1 polygonu, tada su "cut faces tool" (nzn koks maxe) sukarpai svarbiausias dalis taupydami polygonus. sumazini polygonu skaiciu "mergendamas vertices". Tada svarbiausias dalis kurios turi iskilti ar sustumti "extrudini" po to susitvarkai su UVS.
pastaba svarbi- su tokiu dydziu kuriuo pradejot dirbti su pirmu polygon planu ir teks dirbti toliau, kitiap sakant cia bus kaip mastelis. todel geriausia pasikopinti pradzioje. Kai turit viena langa su textura, ja galite paduplicatinti ir turesite visa auksta. Aisku ta textura turi buti gerai apdirbta kad nesimatytu per siules kad prikopinta 🙂 tada darai antra auksta ir t.t. saligatvi ir t.t. Jei zaidimas ne "supermen" tai antram aukstui poliud darai mazaiu nes zaidejas paprasciausiai nepriena arti prie 2 auksto. tada isimeti i Zbrusha ir dirbi su normal mapais didesnems detalems. kurios uzims taip pat tik +1 poli.
ne visos zaidimu kompanijos turi unrealo engine kurio kaina tokia kosmine todel visi taupo skaiciavimus, kitaip sakant seseliai ir atspindziai tampa per brangus. Kaip chytinti?
seseliai- tai atskiri polygon plane (po 1 poly) su ikelta textura suapvalintais kampais. aisku reikia suprasti kur ir kokiu kapu ji padeti kad jis butu racionalus.
atspindziai pvz norite sukurti bala nuo kurios veidrodzio principu atsispindetu? kaip padaryti? 🙂 lol, cia smagiausia dalis... sukuri balos textura, is krastu alpha padarai kokia 20% centre kokia 50%. ikeli ant saligatviu kuriu nori kad butu. tada nukopini visus planus (pastatus) apverti ir pridedi is apacios. tada kai ziuri is virsaus i bala matai ta pati pastata per bala, bet tau atrodo kad tai 50% skaidrumo atspindys 🙂 ir visoms baloms tinnka 🙂 klausiau destytuo ar ne per brangu nes poliai pasidvigubina, bet sake daug sunkiau yra skaiciuoti atspindzius nei taip chytinti.
tai va, nezn ar cia jums idomu apie geimus, gal kaip kurie visa tai zinot. Turiu scena destytuvo is geimo "James bond royale casino" nzn tikriausiai sudinas tas geimas bet kvartalas tai afegenas 🙂 na toks ale blogas rajonas padarytas su dirtmapais 🙂
taip pridedu scena taigi instalinkit maya ir lyskit vidun 🙂 pati scena sveria apie 5mb, bet texturos apie 140mb...
ok o dabar reikia lekti i marketa nusipirktie pieno ir kokios desros nes jau badas zvelgia i akis... geros dienos ir siuskit pinigelius 3dbugui, nes jei jo nebus tai nebus ir man kur rasyti 🙂 lol, peace...
--
Less is more!
0 Taškai
Žinutės: 316
Miestas: Vilnius
Prisijungė: 2007-01-15
Miestas: Vilnius
Prisijungė: 2007-01-15
Jums reikės prisijungti, jei norite rašyti atsakymą.